¶ What is XBSX2?
XBSX2 is an emulator that allows you to play PlayStation 2 (PS2) games on your Xbox Series X|S, taking advantage of the hardware to provide smooth gameplay with features such as:
- Higher resolutions (up to 4K)
- HD texture packs
- 60fps patches
- Multiplayer (local and online)
¶ Requirements Checklist
¶ Setting up XBSX2 on Xbox
¶ Download the Necessary Files
- On your computer, go to GitHub or the Dev Store.
- Download the latest version of XBSX2.
- You'll get one file: the .msix file (XBSX2 itself)
¶ Transfer the Files to Xbox
In order to install XBSX2 on your Xbox, you'll need to use the Xbox Device Portal on your computer.
- Go to Xbox Dev Mode on your Xbox. Look for the IP Address of your Xbox on the Developer Home Screen (it looks like 192.168.x.x/10.0.x.x).
- On your PC, open a web browser and enter the Xbox IP address in the URL bar. This opens the Xbox Device Portal.
- Sign in using your Xbox Developer credentials.
¶ Upload XBSX2
- In the Device Portal, go to My Games & Apps.
- Click Add, then select Choose File.
- Upload the XBSX2 .msix file.
- Click Next and follow the prompts to install.
Troubleshooting: If the app doesn’t install correctly or gets stuck, refresh the page and retry.
¶ Setting Up BIOS Files
A BIOS file is a core system file for running PS2 games. You’ll need to legally obtain a PS2 BIOS from a PlayStation 2 console you own.
¶ Get the PS2 BIOS File
Important: You must obtain the BIOS from your own PS2 hardware. There are several legal ways to do this:
- Use tools like FreeMcBoot on your PS2 console.
- Dump the BIOS using a modded PS2 or PS3.
- You can also extract a PS2 Bios from the PS3 firmware without a console. Watch this tutorial to learn how to do this.
¶ Option 1: Using a USB drive
- Format your USB drive to NTFS and apply permissions. Click here if you don't know how to do this.
- Create a folder named
XBSX2on the USB drive. - Inside that folder, create another folder called
BIOS. - Copy the PS2 BIOS file to the
BIOSfolder on your USB drive.

5. Make sure your BIOS should be like in the Picture.

¶ Option 2: Internal storage
- Upload the PS2 BIOS file using the Xbox Device Portal:
- Go to Dev Portal > File Explorer > LocalAppData > XBSX2 > LocalState
- Create a
BIOSfolder (if it doesn’t already exist).
- Copy the BIOS files into this folder.
¶ Configure BIOS on Xbox
- Plug the USB drive into your Xbox.
- Open XBSX2 on the Xbox.
- Navigate to Settings > BIOS Directory.
- Point the BIOS directory to the
BIOSfolder on your USB drive or internal storage. - Once You've done BIOS Part then Click BIOS Selection to see if your BIOS show up like this:
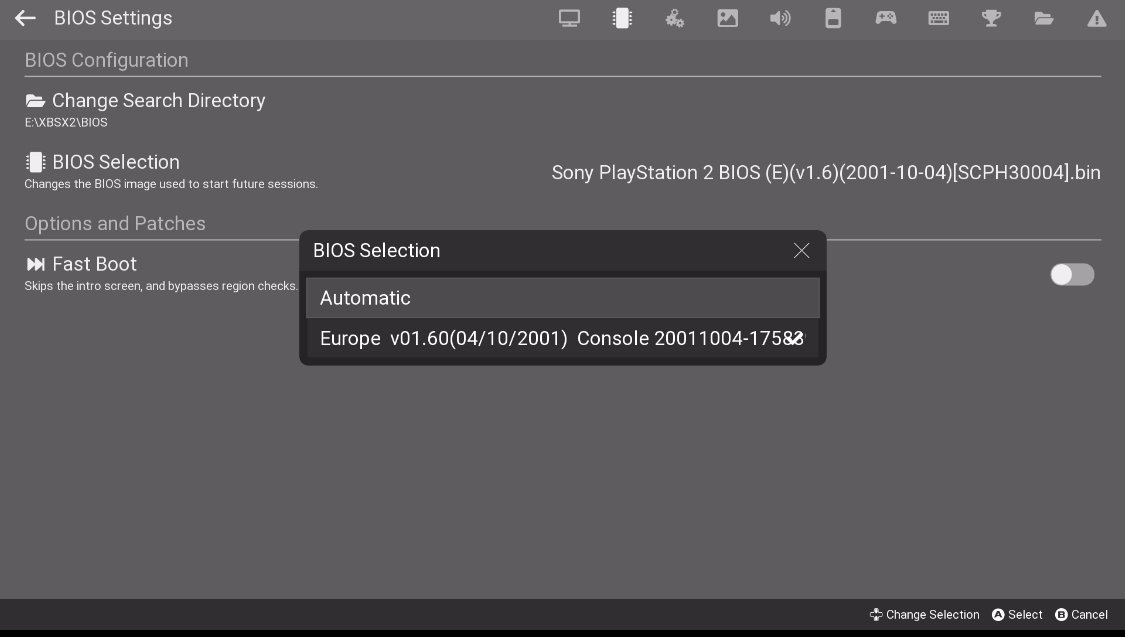
But if your BIOS does not show up then you need to redump your BIOS.
¶ Adding PS2 Games
You need to legally dump your PS2 games. If you have physical PS2 discs, you can use a tool like ImgBurn on a PC to convert them into ISO files. Your ROMs should be ISO, BIN/CUE, or CHD files.
¶ Option 1: Transfer Games via USB
- On your USB drive, create a folder named
Games. - Inside the
Gamesfolder, create another folder calledPlayStation 2. - Copy your PS2 game ISOs into the
PlayStation 2folder.

- Optional: If you want cover art for your games, download images (e.g., from GameFAQs) and rename them to match the game files.

¶ Option 2: Upload Games to Internal Storage
- Use the Xbox Device Portal to upload games:
- Go to Dev Portal > File Explorer > DevelopmentFiles > WindowsApps > XBSX2.
- Create a folder named
Gamesin this directory.
- Upload the ROMs as .ISO, BIN/CUE, or CHD files.
- You can upload them as
.zipfiles, and the Dev Portal will prompt you to unzip them automatically.
- You can upload them as
¶ Configure Games Directory on Xbox
- Open XBSX2 on the Xbox.
- Go to Games List > Games Directory Tab.
- Point the games directory to the
PlayStation 2folder on your USB drive or theGamesfolder in internal storage.
¶ Configuring Memory Cards
To save your games in XBSX2, you need virtual memory cards.
¶ Option 1: USB Memory Cards
- On your USB drive, go to the
XBSX2folder. - Create a folder named
MemoryCards.
¶ Option 2: Internal Storage Memory Cards
- Using the Xbox Device Portal, go to Dev portal > File explorer > LocalAppData > XBSX2 > LocalState.
- Create a
MemoryCardsfolder (if it doesn’t exist).
¶ Set Up Memory Cards in XBSX2
- Open XBSX2 on your Xbox.
- Navigate to Settings > Memory Card Settings.
- Set Slot 1 to use the
MemoryCardsfolder on your USB drive or internal storage.
Tip: Use folder-based memory cards so you never run out of save space.
¶ Controller Setup
¶ Mapping the Xbox Controller
- Open XBSX2, go to Settings > Controllers.
- In Controller Port 1, set the controller type to DualShock 2.
- Use Automatic Mapping to automatically map the Xbox controller buttons to their PS2 counterparts.
Note: You can also manually customize each button mapping for more control.
¶ Multiplayer Setup
For multiplayer, set up the controllers as:
- Player 1: Controller Port 1
- Player 2: Controller Port 2, and so on.
Enable the Multitap setting if you plan on using more than 2 controllers.
¶ Adding Cheat Codes
¶ Find and Download Cheat Codes
- Find cheats for your desired games. Recommended websites:
- Download the cheats in PCSX2 PNACH format.
¶ Rename the PNACH File
Each game has a unique identifier called a CRC32 code. To apply the cheat code to your game, you must rename the downloaded PNACH file to match the CRC32 code of your game.
Finding the CRC32 Code:
- Open XBSX2 and navigate to your game list.
- Highlight the game in question and press Y (or the menu button).
- The CRC32 code will be displayed on the right side of the screen. Write it down.
¶ Edit the Cheat File (Optional)
If you want to manually add or tweak cheats:
- Open the PNACH file in a text editor (e.g., Notepad).
- Cheats are written as follows:
/patch=1,EE,XXXXXXXX,extended,YYYYYYYY
- Replace XXXXXXXX with the memory address and YYYYYYYY with the cheat value.
¶ Option 1: Add Cheats to USB
- Go to the
XBSX2folder on your USB drive. - Create a subfolder called
Cheats. - Place the renamed PNACH files in the
Cheatsfolder.
¶ Option 2: Add Cheats to Internal Storage
- Use the Xbox Device Portal to access:
- Dev Portal > File Explorer > LocalAppData > XBSX2 > LocalState
- Create a
Cheatsfolder here (if it doesn’t exist) and add the PNACH files.
¶ Enable Cheats in XBSX2
- Plug the USB drive back into the Xbox.
- Open XBSX2 and go to the Cheats Menu.
- Enable the desired cheats from the list, then launch the game.
¶ Applying 60FPS Patches
Some PS2 games run at 30fps by default. With 60fps patches, you can double the frame rate.
¶ Find 60FPS Codes
- Go to forums like the PCSX2 forums or GameHacking.org.
- Search for the 60fps patch for your game
¶ Add the 60FPS Patch to the Cheat File
If you find the 60fps patch in raw format (hex codes), add it to your PNACH file as follows:
- Open the existing PNACH file for the game.
- Add a new line:
patch=1,EE,XXXXXXXX,extended,YYYYYYYY
Replace the XXXXXXXX and YYYYYYYY with the values provided by the patch.
¶ Option 1: Transfer by USB Drive
- On your USB drive, create a folder named
Cheatsinside your XBSX2 folder. - Copy the renamed PNACH file into the Cheats folder.
¶ Option 2: Transfer to Internal Storage
- Use the Xbox Device Portal to upload the PNACH file:
- Go to File Explorer > LocalAppData > XBSX2 > LocalState.
- Create a
Cheatsfolder (if it doesn’t exist) and upload the PNACH file there.
¶ Enable 60FPS Patch in XBSX2
- Open XBSX2 on your Xbox.
- Go to the Cheats Menu.
- Toggle the 60fps patch and launch the game.
¶ Setting Up HD Texture Packs
HD Texture Packs replace the original textures in PS2 games with high-resolution versions, making old games look sharper and more detailed.
¶ Download HD Texture Packs
There's no central hub for texture packs, but there are still plenty of places to find them:
- Dev Store
- GBATEMP.net
- Community Discords like: Xbox Emulation Hub & Revives Community Server.
Steps:
- Search for an HD texture pack for your game.
- Download it
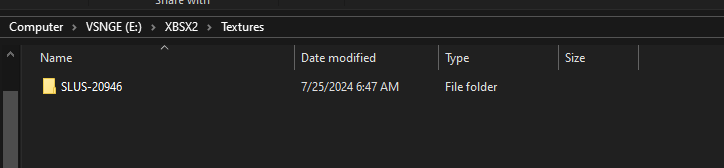
¶ Prepare the Texture Pack
- Once downloaded, extract the texture pack.
- The extracted files should be in a folder named after the game’s SLUS/SLES code (you can find this code on the game's box or in XBSX2 under Game Details).
¶ Option 1: Add Textures via USB
- On your USB drive, go to the
XBSX2folder. - Create a subfolder named
Textures. - Inside the
Texturesfolder, add the folder with the game’s SLUS/SLES code.
¶ Option 2: Upload Textures to Internal Storage
- Use the Xbox Device Portal to upload the texture files.
- Go to Dev Portal > File Explorer > LocalAppData > XBSX2 > LocalState > Textures.
- Upload the game-specific texture folder here.
¶ Enable HD Textures in XBSX2
- Open XBSX2 on your Xbox.
- Go to Settings > Graphics.
- Toggle Enable Texture Replacement.
- Launch your game, and the HD textures will automatically be applied.
¶ Recommended settings
¶ Widescreen Patches
- Enable Widescreen Patches for games that didn’t support widescreen natively.
- In Settings > Graphics, toggle Enable Widescreen Patches.
- This stretches the image without distorting the game.
¶ Frame Pacing and Vsync
- For smoother performance, enable Optimal Frame Pacing in Settings > Performance.
- Turn on Vsync to prevent screen tearing, which can occur when the game’s frame rate doesn’t match the TV’s refresh rate.
¶ Resolution and Performance Tuning
- In XBSX2, you can change the internal resolution (e.g., from native PS2 resolution to 1080p or 4K) to enhance game visuals.
- Go to Settings > Graphics and adjust the Internal Resolution to 2x, 4x, or even 8x native resolution for crisper textures.
Note: Higher resolutions may reduce performance, especially in demanding games.